How to publish a recognizer
This guide will walk you through publishing your own recognizer.
Why publish your recognizer? #
See the why publish your recognizer page.
What is GitHub and why is it great for this purpose? #
Git is a version control tool for code and text. Git allows you to track changes, collaborate with others, and manage
different versions of your work. GitHub provides a web-based social platform for hosting and sharing Git repositories.
GitHub is a popular way to share scientific work and is free for most of the features we need. You can read more about
git and its uses from GitHub’s documentation page
Version Control #
Version control is a system for recording changes to files over time, allowing you to track any modifications and revert back to previous versions. Version control is great for making collaboration with others seamless and manageable.
Zenodo - DOI generation #
Zenodo is an open-source project for generating DOIs that integrates well with GitHub. We recommend using Zenodo for generating a permanent DOI (Digital Object Identifier) for your recognizer. A DOI provides a unique and persistent identifier for your work, enabling others to cite it in their publications. Obtaining a DOI through Zenodo enhances the discoverability and visibility of your recognizer contributing to the impact and recognition of your work within the scientific community.
How to publish your recognizer #
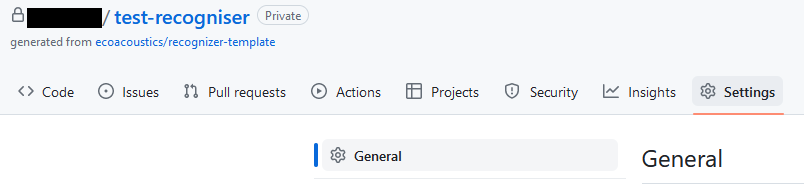
We recommend using our Recognizer Template in GitHub
What goes in the repository? #
One or more recognizers, which should consist of:
- Code to run the recognizers (e.g. scripts)
- The code for the recognizers or scripts to download and install the software/packages needed
- Test and training data (or instructions on how to access said data)
- Models or artifacts (or instructions on how to access said data)
A README.md file that describes:
- What species are detected by the recognizer.
- The performance of the recognizer.
- License and attribution information.
- Instructions for setting up and running the recognizer
How do I use the GitHub template to publish my recognizer? #
Step 1. Log in to GitHub #
If you already have a GitHub account, log in
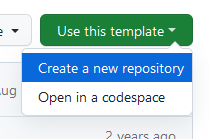
Step 2. Use the template as a start for a repository #
Once you are logged in, go to the Recognizer Template repository
Then, in the following page:
- input a name for your recognizer repository.
You should use
kebab-case(all lower case, using hyphens instead of spaces) to title your repository as this is the convention used for most repositories on GitHub. For example:
- A repository that contained a recognizer for a Red-tailed Black-cockatoo might be named
red-tailed-black-cockatoo-recognizer.- a project that detects frogs in SE Queensland might be named
se-queensland-frogs-recognizer- repository that hosts all the recognizers for your group might simply be called
ecoacoustics-recognizers
-
You can choose if you want your repository to be public or private. Private is a good choice if you’re not ready to publicly publish but you want to get started. See Step 5. Publish your recognizer in GitHub for more information.
-
Leave the box that says include all branches unchecked.
-
Click Create repository from template.
-
Then review the instructions in the
README.mdfile in your new repository
Step 3. Add test and training data #
Adding your training data makes it very transparent what kind of audio events your recognizers was trained on, which helps others understand how applicable your recognizer is to their situation. Adding testing data makes your reported accuracy results verifiable by others. Both of these will increase the likelihood that other researchers will use your recognizer.
If your datasets are too large to include in a git repository, which will often be the case, you might like to include a link where they can be downloaded (see What to do when your training data set is too large).
Step 4. Add code and models #
If you want to publish code with the recognizer, add it to the src folder.
Similarly, if you have a trained model or other artefacts produced while developing your recognizer,
put them to artifacts folder. Examples of this might be
- a configuration file which dictates how the code should be run specifically for the species and model in question,
- file which contains the parameters of the function that maps your audio segments to a detection result, such as the weights of a neural network.
Step 5. Publish your recognizer in GitHub #
Once you are ready to publish your recognizer you can do so by
making your repository public
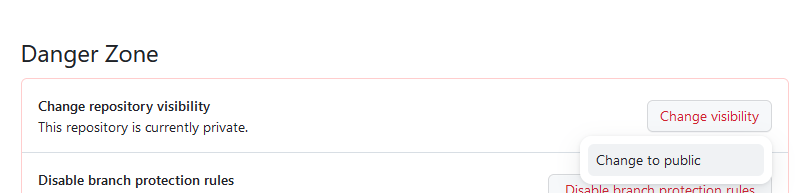
- In your repository go to the Settings tab
- In the General section, scroll to the bottom Danger Zone
- Click the button Change visibility and select Change to public
Step 6. Generate a DOI using Zenodo #
Generating a DOI will make this repository Findable and Citable
- Go to Zenodo
. - Use your GitHub account to log in.
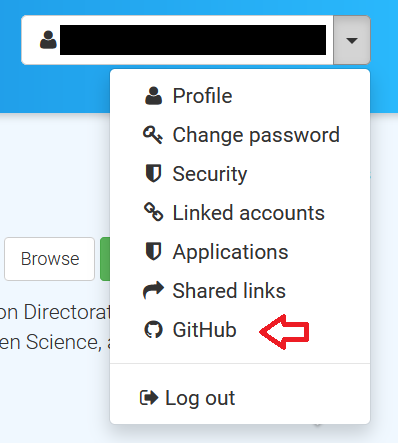
- Once you are logged in, choose Github from the drop-down menu by clicking the arrow next to your email address
in the top right-hand side menu.
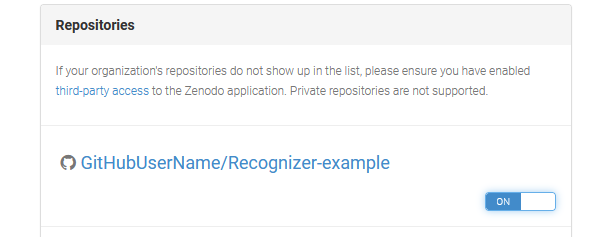
- On this page you will see a list of your repositories. Flip the switch next to the recognizer repository you created to the ON-position.
- Go to Github and create a release
. Zenodo will automatically generate a DOI for this release which you should now see in Zenodo GitHub page. Zenodo will generate a new DOI version for each release. Read about Zenodo Versioning . - Go to your Zenodo page for your repository.
- Finally, you can copy the DOI-badge from the DOI-page by clicking the DOI-badge on the side panel.
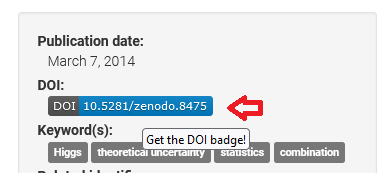 We recommend copying the Markdown text and adding it to your README-file in your GitHub recognizer repository.
Step 7. Add or modify a citation information file #
To make your GitHub recognizer repository easily citable we recommend adding a citation information file (CITATION.cff).
- Please use the
CITATION.cff generation website
to create a CITATION.cfffile. - Replace the
CITATION.cfffile in your repository with the file you generated.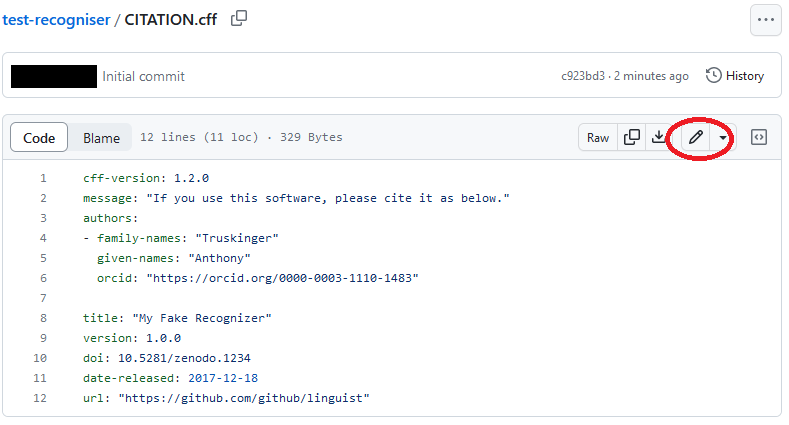 You can edit files in your browser by clicking the pen icon.
 - Once you are happy with your changes, save the file by clicking the Commit changes… button. You can commit your changes directly to the main branch.
- If you will be collaborating with multiple authors we recommend learning more about working with branches in GitHub
.
Step 8. List your recognizer in the registry #
Please see the Contribute to the registry page.
FAQ #
What to do when your training data set is too large? #
Storing data in a repository is not always the right choice. In each folder where it is relevant you should include:
- Small sets of audio samples
- A README.md containing
- provenance of any data included
- instructions on how to obtain more data
- Any scripts needed to download data from remote repositories
For larger datasets it is not ideal to store the data in the GitHub repository. In this case the test and training data should be stored via a different method. Some options you can use are:
- An ecoacoustics repository
- A bioacoustics repository
- like Xeno Canto
- like Xeno Canto
- Cloud storage options like DropBox, OneDrive, etc.
- Commercial services like Amazon S3, Google Cloud Storage, etc.
How do I keep my recognizer private until I’m ready to publish? #
It is a good idea to set up a repository as soon as you start working on your recognizer, however there are good reasons to keep your repository private until you’re ready to publish it.
Reasons to keep your repository private:
- Waiting to publish the recognizer along with a publication.
- Keeping sensitive recognizers hidden until it is safe to release them.
- Allowing you time to develop your work before you release it.
- GitHub has strong access control mechanisms so you can invite specific people to collaborate with you until you’re ready to release the recognizer publicly.
After these concerns have passed it’s a great time to publish your recognizer. You can do so by changing the repository settings:
How to change the repository settings? #
- In your repository go to the Settings tab
- In the General section, scroll to the bottom of the page to heading Danger Zone
- Click the button Change visibility and select Change to private. Once you are ready to publish, go to this same setting and select Change to public.
See more in GitHub Documentation:
setting repository visibility
Who owns my recognizer? #
You! That’s one of the reasons we think GitHub is great: you control and own your IP and this guide is just helping you do that.
Is the template and GitHub still a good choice for a recognizer that will only ever be private? #
Yes! version control, access control, common pattern for publishing, all other advantages listed in this article.