Practical
Difficulty: moderate.
We recommend undertaking the Software Carpentry lesson for using the shell if you have difficulty: https://swcarpentry.github.io/shell-novice/
Setup #
Follow the instructions in the Requirements document.
Open a Terminal #
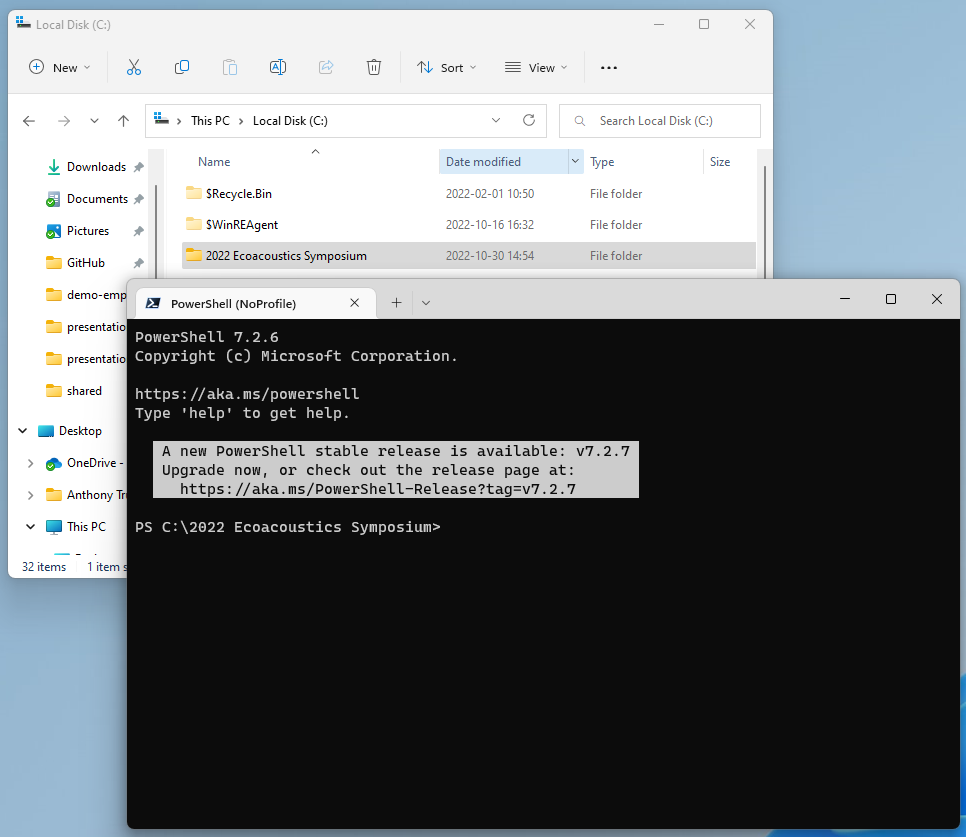
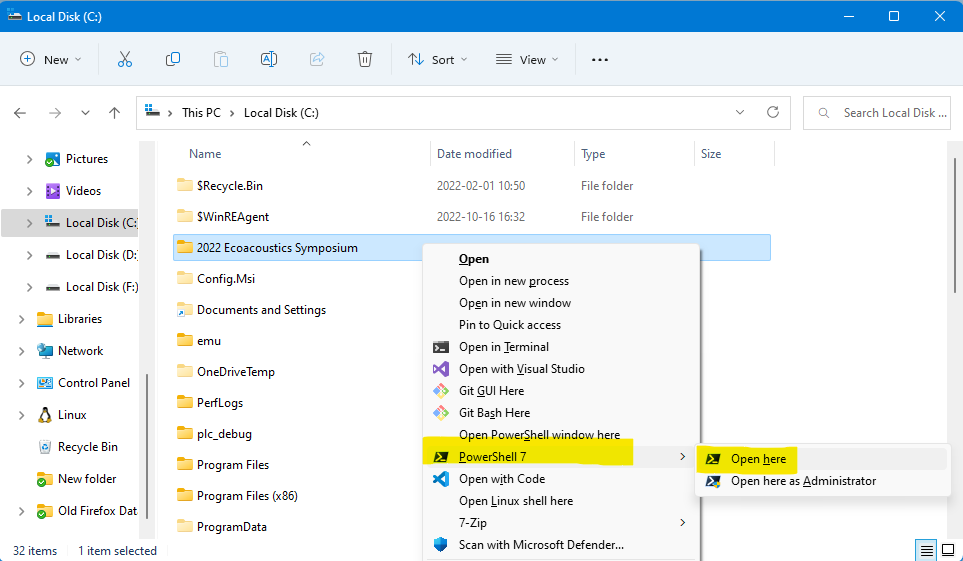
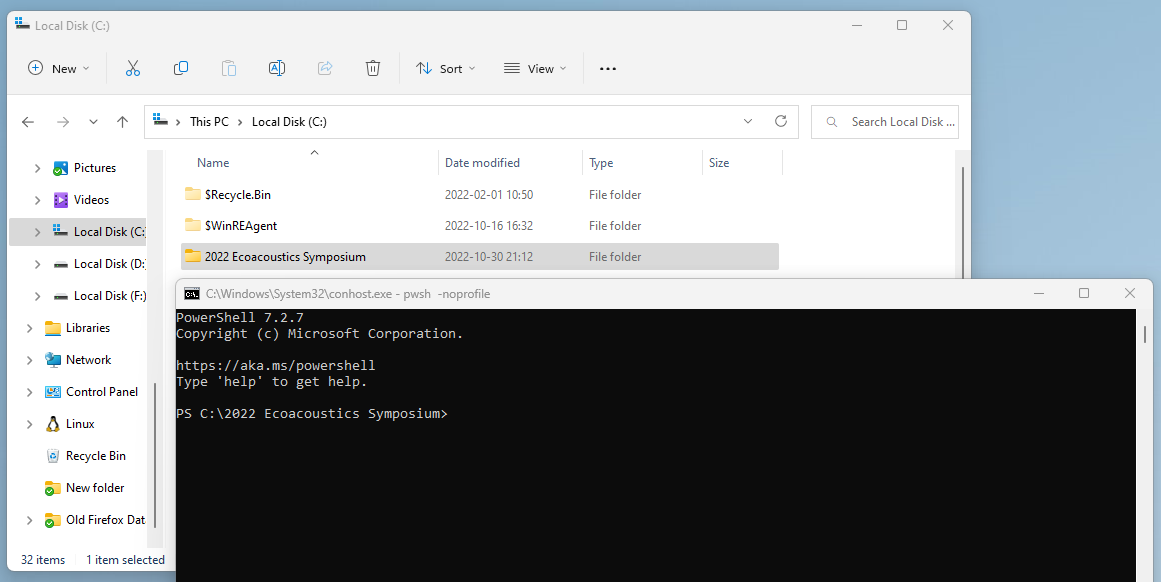
Now open a terminal in the folder where you downloaded the files:
- Open Windows Explorer to the folder where you downloaded the data
- Right click on the folder and choose Open in Terminal

It should look like this:
- Open Windows Explorer to the folder where you downloaded the data
- Right click on the folder and choose Open in Terminal
It should look like this:
- Open Terminal
cdto the directory of the downloaded workshop materials- e.g.
cd "/2022 Ecoacoustics Symposium"
- e.g.
- Open Terminal
cdto the directory of the downloaded workshop materials- e.g.
cd "/2022 Ecoacoustics Symposium"
- e.g.
Terminal use #
Anytime you see command to run, we’ll present it in a code box that will look like this.
> <command to run>The
>denotes a prompt, which is your cue to run the command after the prompt.For example:
> mkdir resultsYou would type (or copy and paste)
mkdir resultsinto your terminal. Do not include the prompt (the>symbol).To run a command press Enter on your keyboard.
We might include a comment (a line starting with a
#) and we might show you the output of your command as well.# I am a comment > echo "I am output" I am outputOften we will omit the output for brevity.
Previous commands can be run again by using the up and down arrow keys to cycle through those commands.
Lastly, if your terminal reports it cannot find a program you just installed, try closing the terminal, and then reopen it.
Manipulating files with FFmpeg #
First let’s create a directory for the results.
> mkdir ffmpeg-output

    Directory: C:\2022 Ecoacoustics Symposium

Mode                 LastWriteTime         Length Name
----                 -------------         ------ ----
d----          2022-10-30    19:45                ffmpeg-output
The basic syntax for any FFmpeg command is:
ffmpeg -i [input_file] [optional_arguments] <output_file>
Converting a FLAC file to a WAVE file #
Run the following command:
> ffmpeg -i './SERF Data/20220421T100000+1000_SEQP-Samford-Wet-B_644370.flac' ./ffmpeg-output/20220421T100000+1000_SEQP-Samford-Wet-B_644370.wav
Open the C:\2022 Ecoacoustics Symposium\ffmpeg-output and have a look at your
brand new WAVE file!
Try the following exercises as well:
- Look at each command and try to find the differences
- After each command is run, inspect the output file in the
ffmpeg-outputfolder.
Cut out the 10th minute #
> ffmpeg -i './SERF Data/20220421T100000+1000_SEQP-Samford-Wet-B_644370.flac' -ss 300 -t 60 ./ffmpeg-output/20220421T100000+1000_SEQP-Samford-Wet-B_644370_360-420.wav
Mix down multiple channels into one single channel #
> ffmpeg -i './SERF Data/20220421T100000+1000_SEQP-Samford-Wet-B_644370.flac' -ac 1 ./ffmpeg-output/20220421T100000+1000_SEQP-Samford-Wet-B_644370_mixdown.wav
Note: there is only one channel in our source data. You won’t see any difference in the output.
Down-sample to a different frequency (8000 Hz) #
> ffmpeg -i './SERF Data/20220421T100000+1000_SEQP-Samford-Wet-B_644370.flac' -ar 8000 ./ffmpeg-output/20220421T100000+1000_SEQP-Samford-Wet-B_644370_down_sample.wav
Putting it all together #
> ffmpeg -i './SERF Data/20220421T100000+1000_SEQP-Samford-Wet-B_644370.flac' -ss 3600 -t 60 -ac 1 -ar 8000 ./ffmpeg-output/20220421T100000+1000_SEQP-Samford-Wet-B_644370_3600-3660.wav
The above command cuts out one minute, starting from one hour (3600 seconds) into the file, and mixes down channels into a mono output, and down-samples to 8000 Hertz.
What else can you do? #
Try later, on your own:
- Converting a FLAC file to WAVE and then back to FLAC again
- Cutting out different portions of a file
- Up-sampling; does it work? Why not?
You can find all the options above described in full in the FFmpeg documentation
Using the AnalysisPrograms (AP) audio cutter #
AP uses FFmpeg itself. If you’re comfortable with FFmpeg then you don’t need to use AP. However if you want one single command that segments an entire file at once, with options that are useful for common ecoacoustics analyses, then give the cutter a go.
The basic syntax is
AnalysisPrograms.exe AudioCutter [options] <InputFile> <OutputDir>
Run this command:
> AP audiocutter '.\SERF Data\20220421T200000+1000_SEQP-Samford-Wet-B_644357.flac' audiocutter-output
It should run in under 2-minutes.
Open the C:\2022 Ecoacoustics Symposium\audiocutter-output and observe the
output. Two hours of FLAC audio segmented into 1-minute WAVE files.
What else can you do? #
Use the help command on the audio cutter to see the options available:
> AP audiocutter --help
- What other options do you see? (You might have to scroll up.)
- Can you change the duration of the segments?
- Can you add overlaps to the segments?
- Can you cut out only a subset of the file?
Later on, try constructing your own command and running that. You may want to put the results into a different folder.
Try EMU #
A Scenario #
Oh no! Something funny happened in my files. Have a look in the
C:\2022 Ecoacoustics Symposium\EMU Examples folder. All the files are empty…
or nearly empty. Time for some EMU.
This is a contrived example: very rarely will you see 100% of the files in a folder all be faulty.

A DALL-E (a deep learning text prompt image generator) image of an emu in a superman costume.
First let’s find all the files in the folder; we want to simulate an analysis looking for source files.
> Get-ChildItem '.\EMU Examples\' -Recurse -Include "*.wav","*.flac"
> find EMU\ Examples/ -name *.wav -or -name *.flac
> find EMU\ Examples/ -name *.wav -or -name *.flac
Using wildcard filters we can see all the files returned. Wouldn’t be better if we could filter out the bad files?
EMU does not yet have an installer. You could save and run the program from any folder on your computer. For the sake of this practical we assume you followed the advice from the EMU Install documentand you extracted EMU to either C:\emuor/emu.
Let’s see what EMU can do for us, run the following command:
> C:\emu\emu.exe --help
> /emu/emu --help
> /emu/emu --help
Note that EMU has a few sub-commands:
Commands:
  metadata <targets>  extracts metadata from one or more files.
  rename <targets>    rename one or more files.
  fix                 fix or check for problems in one or more files
  cues <targets>      Extract cue points from wave files
  version             Show EMU's version. Same as --version but honours --format
                      selection.
Let’s see what the fix command does, and further list the available fixes:
> C:\emu\emu.exe fix --help
> C:\emu\emu.exe fix list
> /emu/emu fix --help
> /emu/emu fix list
> /emu/emu fix --help
> /emu/emu fix list
It looks like some of those fixes might be useful.
Rename the empty and blank files #
The following command will use EMU to fix any instances of:
- OE004: Empty files
- FL001: Preallocated headers (near-empty corrupt files)
- WA002: Generating Files with No Data
In the EMU Examples folder are examples of each of those problems.
Note the --dry-run argument: this prevents EMU
from making any changes to the files. If you remove the dry run argument EMU
will modify the files. Dry runs are a safety feature: they give users a chance
to see if a potentially dangerous action will have the intended affect.
> C:\emu\emu.exe fix apply -f OE004 -f FL001 -f WA002 --dry-run './EMU Examples/'
> /emu/emu fix apply -f OE004 -f FL001 -f WA002 --dry-run './EMU Examples/'
> /emu/emu fix apply -f OE004 -f FL001 -f WA002 --dry-run './EMU Examples/'
Read through the output. If you’re happy EMU will do the correct thing, remove
the --dry-run argument and run the command again to fix the files.
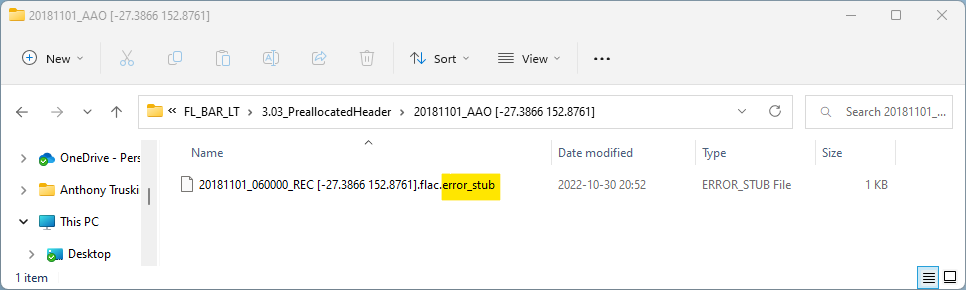
After EMU is done, we should now see all of our empty files renamed to have a non-audio extension. This allows them to be easily filtered out. Try running our find command again:
> Get-ChildItem '.\EMU Examples\' -Recurse -Include "*.wav","*.flac"
> find EMU\ Examples/ -name *.wav -or -name *.flac
> find EMU\ Examples/ -name *.wav -or -name *.flac
You should see no files now! You can look at the files in your file explorer too:
If you wish to turn on seeing file extensions in Windows Explorer then follow thisguide.
Get metadata for some A2O files #
EMU can also show you metadata that is embedded in an audio file.
Try this:
> C:\emu\emu.exe metadata './SERF Data/'
> /emu/emu metadata './SERF Data/'
> /emu/emu metadata './SERF Data/'
This command printed out basic metadata for all the files in the ./SERF Data/ directory.
Let’s try something more useful: we’ll format the output as CSV and save the results to a file.
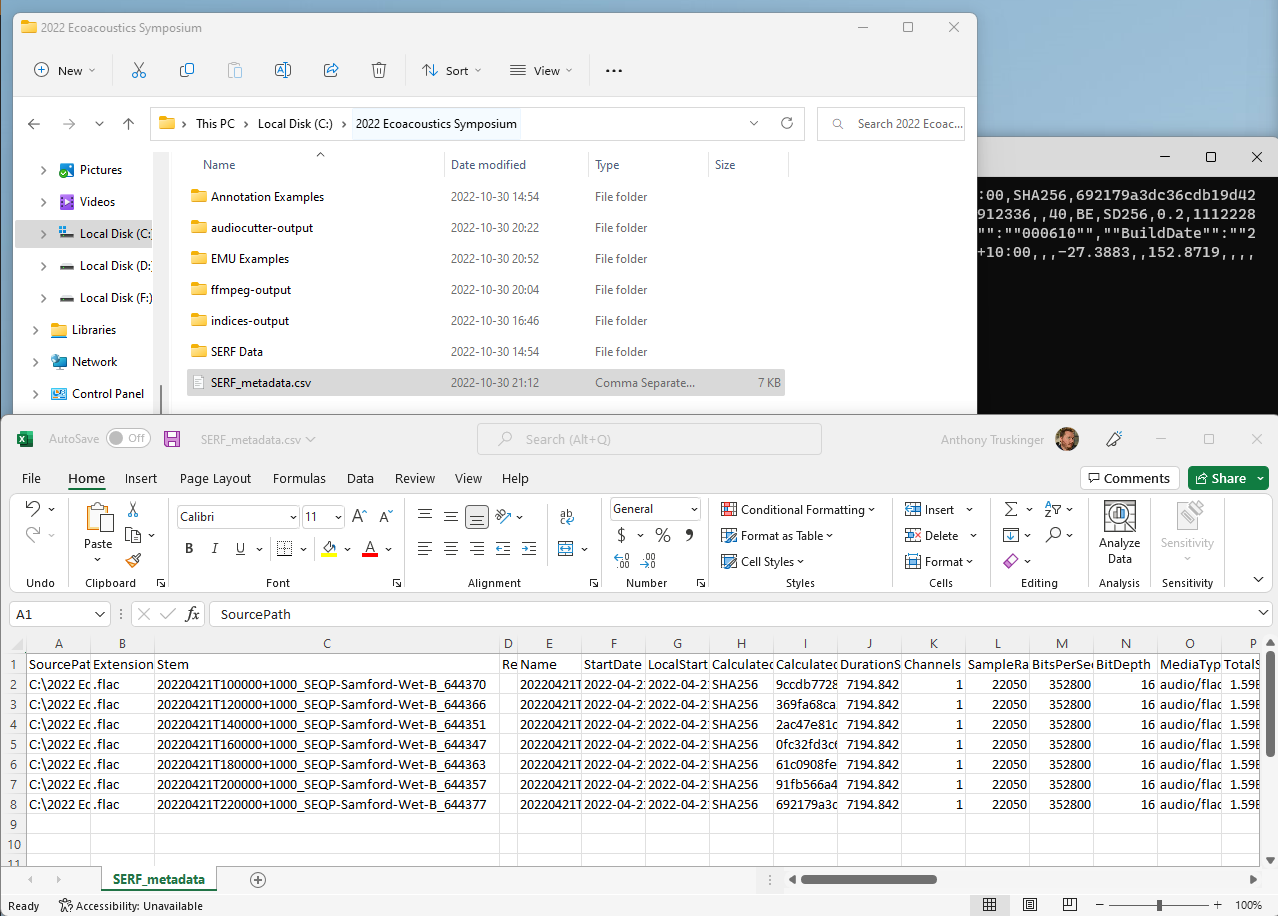
> C:\emu\emu.exe metadata -F CSV -o SERF_metadata.csv './SERF Data/'
> /emu/emu metadata -F CSV -o SERF_metadata.csv './SERF Data/'
> /emu/emu metadata -F CSV -o SERF_metadata.csv './SERF Data/'
Open the metadata file (C:\2022 Ecoacoustics Symposium\SERF_metadata.csv) and have a look at the results:
More examples #
EMU has many more examples in it’s documentation
EMU is still in development. If you find a bug, or it does not do what you expect
it to do, then please let the EMU team know